DIY felt flowers
Have you noticed lately how costly it is make an ordinary gift box look spectacular? DIY felt flowers are unique toppers you can make from scraps and best of all, they’re super inexpensive and easy!
This is a great way to really personalize a gift using items you already have in your craft closet. A few sheets of felt go a long way in creating flower petals and leaves, especially when you’ve got free templates!
Choose your recipient’s favorite colors to personalize that special occasion, or go with holiday colors to celebrate throughout the year. Let’s face it—there’s no sense spending money on ribbons and bows when you can get the same, if not better, effect with a few pieces of felt and some hot glue.
Why stop with toppers? Check out our felt boxes template for a completely homemade gift—box and all!
This post includes links to purchase items you’ll need from our affiliates.
- felt flower pin
- Everyday Dishes & DIY felt flower pin printable
- scissors
- craft felt of your choice
- hot glue gun
- felt embellishments
- jewelry fasteners or bar pin brooches
- pinched petals flower
- Everyday Dishes & DIY pinched petals flower printable
- scissors
- craft felt in colors of your choice
- hot glue gun
- felt ball
- heart-shaped petals
- Everyday Dishes & DIY heart-shaped petals flower printable
- scissors
- craft felt in colors of your choice
- hot glue gun
- felt ball and grosgrain ribbon
- Download the Everyday Dishes & DIY felt flower pin printable. Print and cut out the template using scissors.
- Place the paper cutouts on felt and cut out. You can pin them in place if you want or just hold them in place while cutting—just make sure they don’t shift as you cut or your flower may look wilted, not in full bloom! When you’re finished, you’ll have 2 flower petal shapes and 4 leaves.
- Pinch together the center of the large petal shape, place a small dab of hot glue in the center to secure its shape then hold it in place until the glue cools.
- Next, glue leaves onto the large flower petal shape, making sure to alternate the placement of the leaves with the petal shapes.
- Repeat the process for the small petal shape but glue them to the leaves. Be sure to rotate the placement of the small petal shape so it is between the leaf shapes.
- Glue the felt accessory to the center of the flower. Or if you’re feeling really ambitious, make your own by cutting thin strips of felt to roll and secure them with hot glue.
- Hot glue 2 jewelry fasteners (or a bar pin) to the bottom of the flower and attach the pins to the top of our DIY felt gift box by pushing the pins through the box top. The stiff felt makes it a bit of a challenge to push the pins through, so push firmly but not so hard that it damages the box top!
- Be sure to mention that the flower can be worn as an accessory!


- Download the Everyday Dishes & DIY pinched petals flower printable. Print and cut out the template using scissors.
- Place the paper cutouts on felt and cut out. You can pin them in place if you want or just hold them in place while cutting—just be sure they don’t shift as you cut. When finished, you’ll have 1 large petal shape, 6 individual petals, 1 circle shape and 1 leaf shape.
- Pinch the tapered edge of each small petal together, dab a little hot glue on it then hold it in place until the glue cools. Repeat the process until all 6 petals are complete.
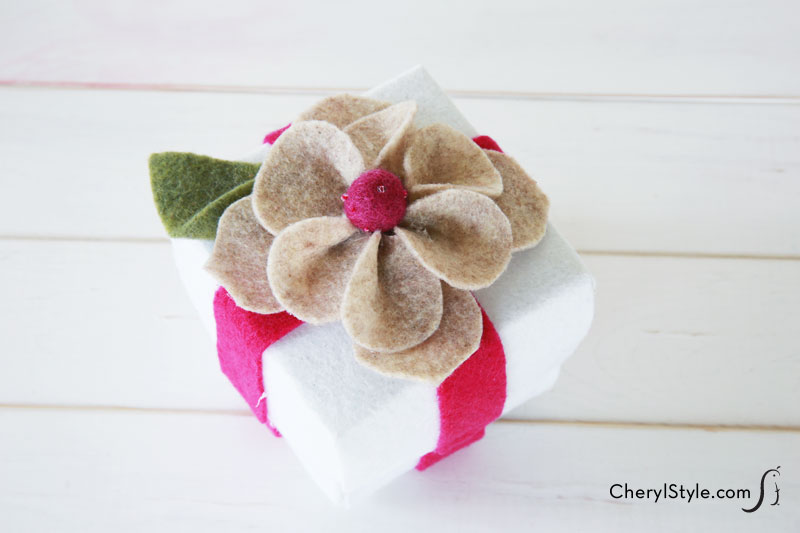
- Create the flower by gathering the petals, gluing them to the circular shape and adding a felt ball (or other embellishment) to the center of the petals.
- Hot glue the petal cluster to the large petal shape then fold the leaf shape in half and glue it to the bottom of the flower.
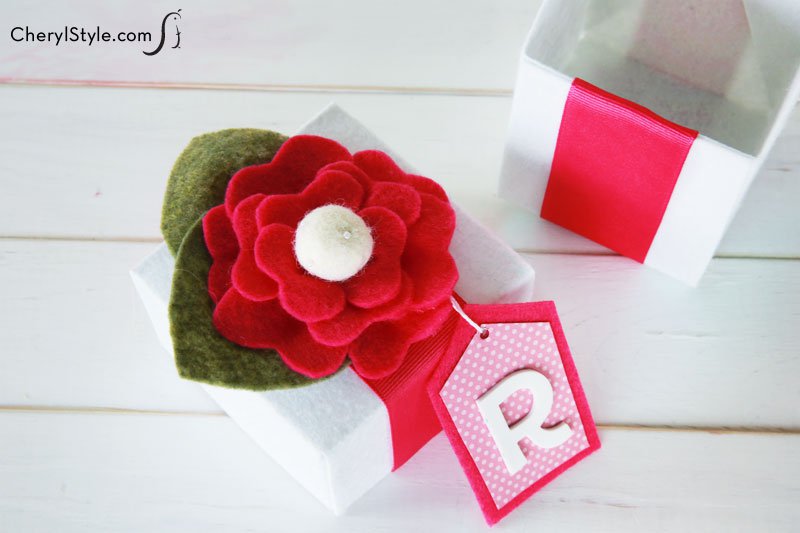
- Glue the flower to the top of your gift box or better yet, try making a Everyday Dishes & DIY felt gift box. Embellish it with felt strips if desired.
- Download the Everyday Dishes & DIY heart-shaped petals flower printable. Print and cut out the template using scissors.
- Place the paper cutouts on felt and cut out. You can pin them in place if you want, or just hold them in place while cutting—just make sure they don’t shift as you cut. When finished, you’ll have 6 small hearts, 3 medium hearts, 3 large hearts for petals and 1 circle for a flower base made from the felt color you chose for your flower.
- As for leaves, you’ll have 3 extra large hearts made from the felt color you selected for your leaves.
- Next, test your surgical skills by cutting a slit in the bottom point of the heart of the petal shapes as indicated by our template. Create the petals of your flower by folding one side of the slit over the other then secure with hot glue—this will add dimension to your flower for a better look.
- Cut a slit between the 2 top rounded shapes for the leaf shapes as indicated on our template. Fold one side of the slit over the other and secure with hot glue to create dimensional leaves for your flower.
- Turn your attention to the 3 large petals. Glue them to the edge of the circular base. Grab the 3 small petals and glue them to the circular base about 1/3″ in from the large petals you just glued in place. You’ll want to place them between the large petals so the petal sizes alternate.
- Glue the 3 remaining petals to the circular base, about 1/4″ in from previous layer. Make sure to alternate the placement of these petals, too.
- Glue 3 medium petals to the BACK of the circular base, making sure to glue the petals between the large petal shapes.
- Finish up by gluing a felt ball (or other embellishment) to the center of the flower and the leaves to the bottom of the flower. Embellish a plain box (or try making a DIY felt gift box) with grosgrain ribbon and a gift tag then glue your flower to the top of the box and it is ready to be filled!