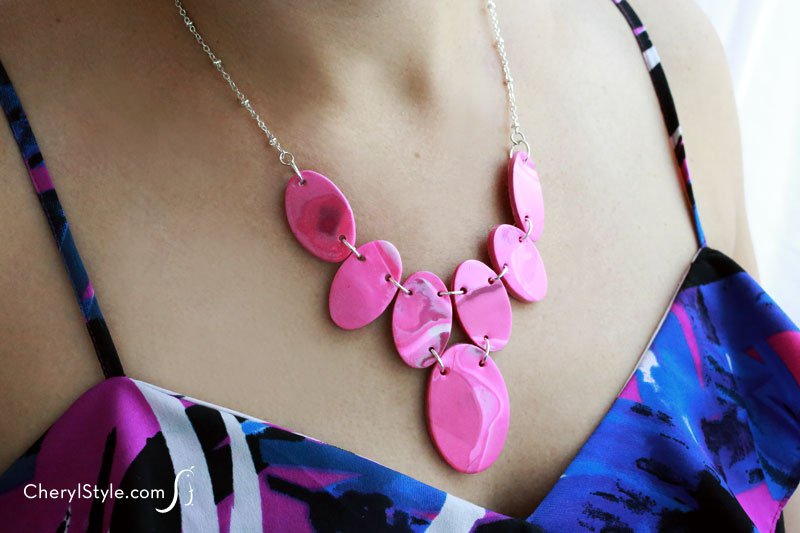
Faux stone clay necklace
Statement jewelry can cost a pretty penny at the store and even then you’re usually settling for something that’s “close enough” instead of “just right.” That’s why we’ve taken to making our own goods—like this faux stone clay necklace.
Honestly, would you ever guess that this was made right here in the Everyday Dishes & DIY office? It’s super cute, if we do say so ourselves. We came up with a DIY process that is easy enough for anyone to do. If you can cut out cookies, you can make this necklace!
They also carry an extensive collection of tools for just about any clay project that you can dream up. We used oval metal cutters but you can opt for a bottle cap or other cookie cutter instead to make and flatten out the pieces.
Kneading the clay with your hands will warm it up and make it more pliable. However, be careful not to overdo it, or you might be left with clay that doesn’t want to hold its shape.
It’s also important to wash your hands before starting on this craft because you’ll leave behind fewer fingerprints on the clay. Fingerprints aren’t entirely avoidable, though. Sanding down the clay once it’s baked will eliminate prints and unwanted blemishes.
Read on for our step-by-step instructions on how to make your own clay necklace and then unleash your creative powers!
This post includes links to purchase items you’ll need from our affiliates.
- [url href=”https://everydaydishes.com/wp-content/uploads/2014/06/faux-stone-clay-necklace-cherylstyle-template.pdf” target=”_blank” title=”Everyday Dishes & DIY Faux Stone Clay Necklace template”]Everyday Dishes & DIY Faux Stone Clay Necklace Printable[/url]
- wax paper
- polymer clay ([url href=”http://www.amazon.com/gp/product/B00KC0EFVI/ref=as_li_qf_sp_asin_il_tl?ie=UTF8&camp=1789&creative=9325&creativeASIN=B00KC0EFVI&linkCode=as2&tag=chery01-20&linkId=NZO6AJITQH4EGYLX” target=”_blank” title=”Sculpey Souffle Clay – Igloo”]white[/url] and [url href=”http://www.amazon.com/gp/product/B00KC0FS14/ref=as_li_qf_sp_asin_il_tl?ie=UTF8&camp=1789&creative=9325&creativeASIN=B00KC0FS14&linkCode=as2&tag=chery01-20&linkId=TD3OMNRNIT5TET7F” target=”_blank” title=”Sculpey Souffle Clay – So 80s”]neon pink[/url])
- [url href=”http://www.amazon.com/gp/product/B00K5923B0/ref=as_li_qf_sp_asin_il_tl?ie=UTF8&camp=1789&creative=9325&creativeASIN=B00K5923B0&linkCode=as2&tag=chery01-20&linkId=2GAMQZGYOSN7M3WS” target=”_blank” title=”Premo Oval Graduated Clay Cutter”]oval graduated cutters[/url] (1.75″ and 2″)
- [url href=”http://www.amazon.com/gp/product/B00002N6FG/ref=as_li_qf_sp_asin_il_tl?ie=UTF8&camp=1789&creative=9325&creativeASIN=B00002N6FG&linkCode=as2&tag=chery01-20&linkId=IYJZPUFHSOAVS6DX” target=”_blank” title=”Sandpaper – Fine”]fine grit sandpaper[/url]
- [url href=”http://www.amazon.com/gp/product/B008GNQ51G/ref=as_li_qf_sp_asin_il_tl?ie=UTF8&camp=1789&creative=9325&creativeASIN=B008GNQ51G&linkCode=as2&tag=chery01-20&linkId=HWLEMKL2R4JHE4K4″ target=”_blank” title=”Sculpey Gloss Glaze”]clay gloss glaze[/url]
- 9 jump rings
- necklace chain
- jewelry pliers
- First, wash your hands and line your work surface with a piece of wax paper.
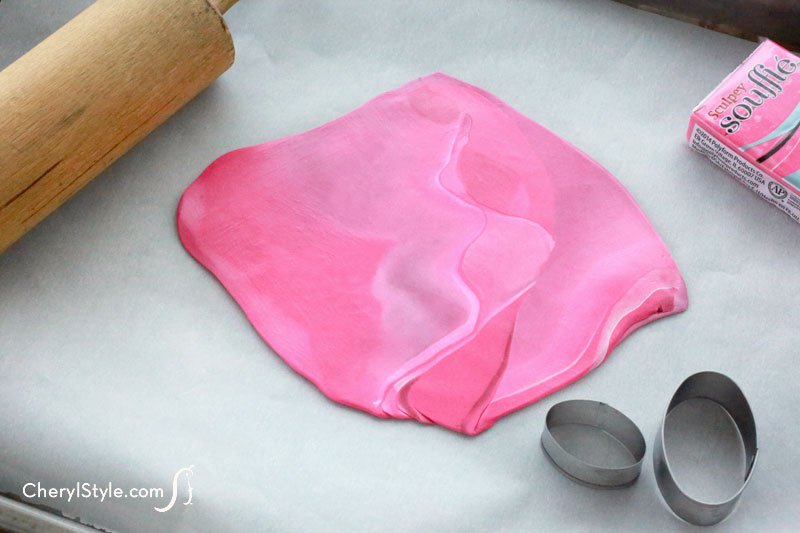
- To give your necklace the look of marbled stone, choose two different colors of clay. Use two pink rectangles and one white rectangle of clay. Place the pieces side by side and then twist together to form one piece. Fold in half and then twist again—just enough to give it a nice swirled look.
- Flatten it out with a rolling pin until it is even and the thickness you desire. Then use the oval cutter and cut out 6 medium-sized (1.75″) ovals and 1 large (2″) oval. Remove and trim away excess clay.
- Download the [url href=”https://everydaydishes.com/wp-content/uploads/2014/06/faux-stone-clay-necklace-cherylstyle-template.pdf” target=”_blank” title=”Everyday Dishes & DIY Faux Stone Clay Necklace template”]Everyday Dishes & DIY Faux Stone Clay Necklace Printable[/url] and open in [url href=”http://get.adobe.com/reader/otherversions/” target=”_blank” rel=”nofollow” title=”Adobe Reader”]Adobe Reader[/url].
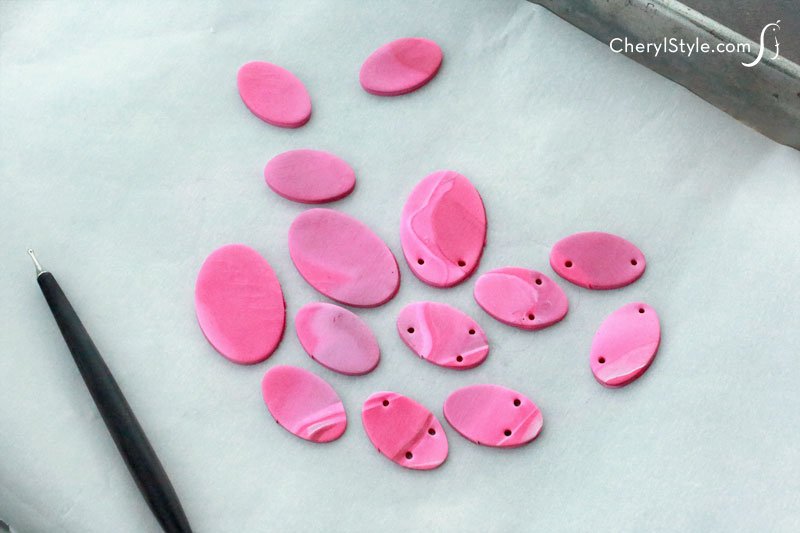
- Follow the necklace template and make holes, using a paperclip, on each clay piece where indicated. This is where you will attach the jump rings. Then smooth out any imperfections with your fingers.
- Preheat the oven to 275 degrees—do not use a microwave oven! Place objects on a wax-covered baking sheet and allow them to bake for a maximum of 30 minutes, or until completely hardened.
- Once cooled, spritz with water and then lightly sand with sandpaper. Coat with clay gloss glaze for a smooth, shiny look. Let dry.
- Twist open jump rings with jewelry pliers and link faux stones one by one as shown in the photo. Attach the chain and clasp using jewelry pliers.