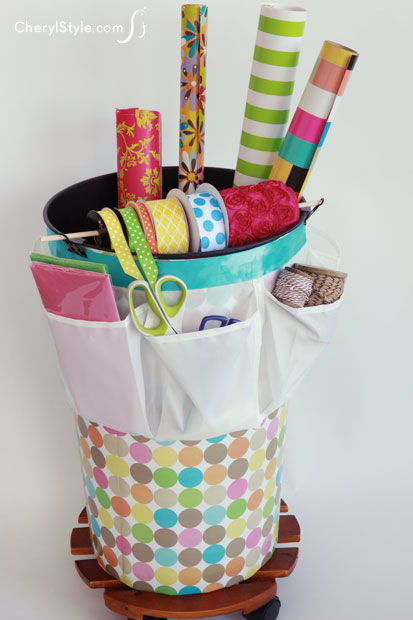
DIY wrapping paper organizer
When it comes to giftwrap, it’d be ideal if you could keep it in good condition when stored. Our DIY wrapping paper organizer is the perfect solution! It’s portable, has pockets for tape and scissors, a ribbon rack and keeps your paper rolls free of tears.
Plus, it is on wheels so you can roll it into the closet instead of shoving it under the bed or lifting it up onto a shelf.
Most store-bought organizers are merely plastic containers in which “stuff” is thrown. It’s frustrating to sift through paper rolls that get torn, unraveling rolls of ribbon and smashed bows.
Who would think that an upcycled wastebasket, a plant caddy, a shoe organizer and a dowel could solve that problem?
You probably have some of the items needed for this practical DIY. Grab a tall roll of giftwrap, tape, your drill and a wood screw. Find a wastebasket you’re not using or splurge and buy a new one for under $13.
You may already have a wood plant caddy—if not, it’s readily available at your local discount or home improvement store. While there, pick up an inexpensive over-the-door shoe organizer and you’re set to begin!
Screw the wastebasket to the center of the plant caddy, cover the basket tightly with giftwrap and secure with tape. Trim any excess so that the paper is flush with the basket’s rim.
Since the basket isn’t a perfect cylinder, the seam will be at an angle, rather than straight. If that bothers you, just cut an extra straight panel of giftwrap and cover the seam to make it appear straight.
The shoe organizer provides the pockets for those items usually scattered all over a regular storage container. Tape, scissors, tissue and gift tags will each have their own little “home.”
It’s easy to cut two separate rows of pockets, place them side by side and connect them using ribbon and hot glue. Trim excess ribbon, wrap the shoe organizer around the basket and secure with glue.
Complete the project with a wood dowel held in place by two binder clips. It not only keeps rolls of ribbon neat and accessible, but also acts as a divider to keep your many rolls of paper upright. You’ll have no trouble finding exactly what you need.
Our wrapping paper organizer is much more functional and decorative than anything from a store. It deserves to come out of the closet and be seen!
- round 14″ wood plant caddy
- round 10.5 gal plastic wastebasket
- 1 ¼” x 4′ round wood dowel, cut to 15″
- 7/8″ wood screw
- 2–1 ¼” binder clips
- 2.5′ x 3′ yard continuous roll giftwrap
- over-the-door shoe organizer
- 4′ ribbon at least 1 ½” wide
- ruler
- pencil
- scissors
- drill
- hot glue gun
- wastebasket
- Turn wastebasket upside down and drill hole through center.
- Drill another hole through center of plant caddy.
- screw wastebasket onto caddy to secure
- Cover wastebasket tightly with giftwrap, secure with tape and trim excess to make giftwrap flush with rim of basket (compensate for resulting angled seam by cutting a straight panel of giftwrap to cover it).
- Cut two separate rows of shoe organizer pockets with scissors.
- Place rows side by side on flat surface.
- Connect rows by gluing ribbon along top edge of each row to make one long row of 8 pockets.
- trim any excess ribbon
- wrap shoe organizer around top edge of wastebasket and secure with hot glue
- fill pockets with scissors, tape, tissue and other supplies
- ribbon holder
- attach binder clips to opposite side of wastebasket clips upright, not folded down
- place rolls of ribbon on dowel
- thread one end of dowel through holes of one clip
- repeat for other end of dowel