Lighted star
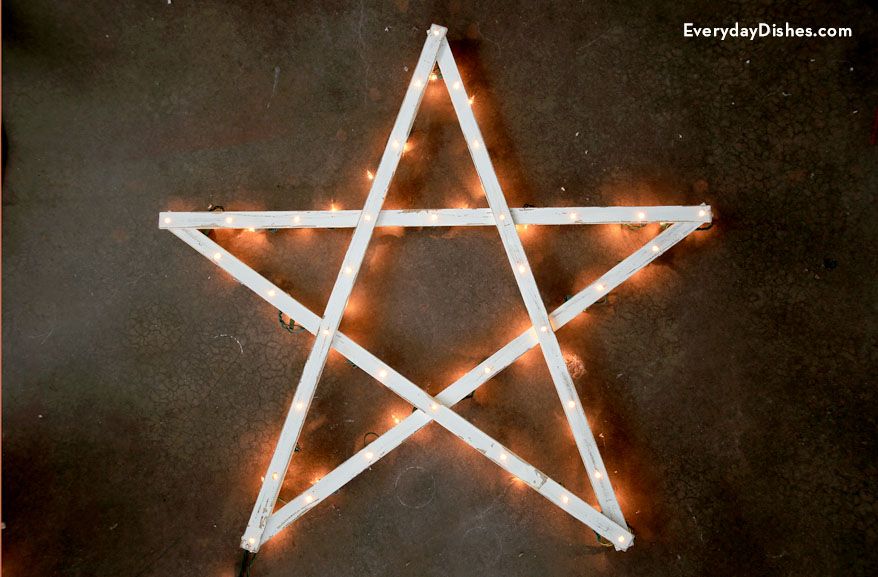
If you really want to make a statement for the holidays, our lighted star is just what you need. Yardsticks and Christmas lights literally become the ‘star’ of your décor.
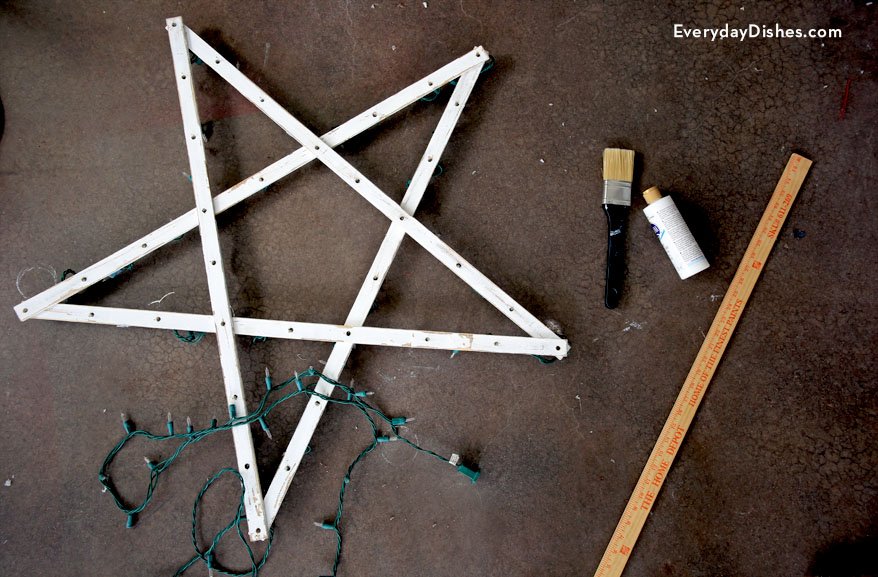
We took the time to drill individual holes for our lights to give this star a more professional look. It takes a little planning, as the number of lights on a string vary as well as their spacing. The key is to space them evenly apart and drill your holes to coincide.
Self-adhesive mini light clips will hold them securely in place. They’re inexpensive, so you can use as many as necessary to keep the light string taut and out of sight.
This post includes links to purchase items you’ll need from our affiliates.
How to make a lighted star
lighted star instructions
Ingredients
- [url href=”http://www.amazon.com/gp/product/B002XJMBZI/ref=as_li_qf_sp_asin_il_tl?ie=UTF8&camp=1789&creative=9325&creativeASIN=B002XJMBZI&linkCode=as2&tag=chery01-20&linkId=H6X74SFKULE7JQ3B” target=”_blank” title=”5-yard Stick”]5 yardsticks[/url]
- white spray paint
- sand paper
- hot glue gun
- binder clips
- drill and drill bits
- [url href=”http://www.amazon.com/Indoor-Light-Adhesive-Clips-31096/dp/B009FL3JNK/ref=sr_1_2?ie=UTF8&qid=1406232388&sr=8-2&keywords=mini+light+adhesive+clips” target=”_blank” title=”Mini Light Clips”]mini light clips[/url]
- string of lights
Instructions
- Paint yardsticks white. When dry, sand edges for a distressed look.
- Form a 5-pointed star with yardsticks, overlapping their ends and hot glue into place. Use binder clips to hold the points in place. Allow the glue to dry at least 5 minutes.
- Lay the star on a work surface that’s safe for drilling. Starting at 1 of the points, remove the binder clip and drill a hole through the glue and both yardsticks where they overlap. Repeat with the remaining points then drill a hole on the interior of the star where the yardsticks overlap.
- Next, drill holes on each yardstick for inserting mini lights. Try to space evenly to match the placement of lights on your string. Use our photo as a guide—we ended up with 9 holes on each yardstick for a total of 45 holes.
- Once the holes have been drilled, follow package instructions to adhere a mini light clip next to each hole. To begin stringing lights, choose 1 of the star’s points from which to start. Insert a light through each drilled hole along the way, running the string through the clips to hold in place. Complete the full length of 1 yardstick before moving on to the next. Add extra clips where necessary to keep the string taut.
- Hang the star above your mantel so that the plug for the lights dangles at the bottom. Plug it in to add a special touch to your holiday décor.
Notes
If you don’t feel comfortable using a drill and want results more quickly, don’t worry! Hot glue will hold the star together and you can wrap the lights around instead. It will still be a striking addition that demands attention.