No-Bake Mini Santa Desserts
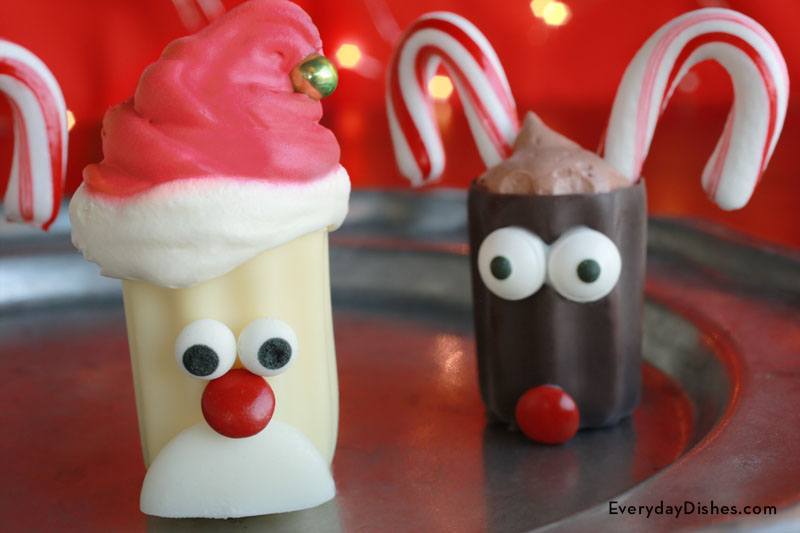
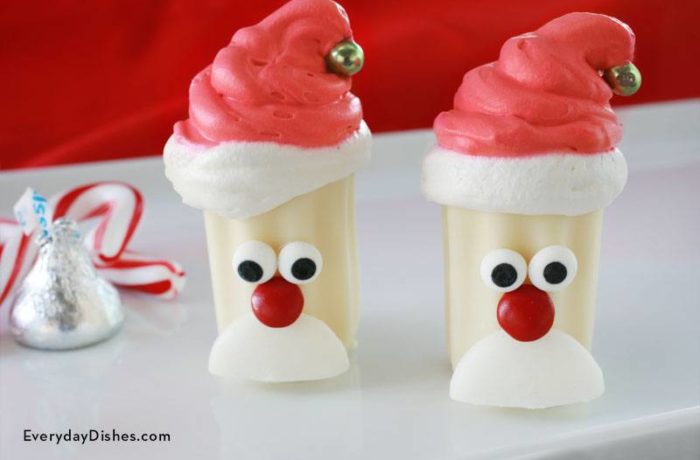
When it comes to holiday treats, these mini Santa desserts prove irresistible. Chocolate candy cups filled with an easy white chocolate mousse recipe then, literally, decorated with eye candy make them so adorable that they’re almost too cute to eat!
We’re always looking for something unique, tasty and quick to make around holiday time—we think we hit the jackpot with this one! Any flavor instant pudding mixed with whipped topping makes a mousse that is non-dairy and will keep safely for the length of the party.
Shopping for candies to decorate these bite-sized guys is fun in itself. Head down the baking aisle of your local grocery and you’ll most likely find the ‘eyeballs’ next to the sprinkles and birthday candles.
You can find candy melts in a host of different colors at your local craft store. If it’s not at your grocery, it can be found in most craft stores or big box stores. A bag goes a long way, so you’ll have plenty left to get you through several parties this holiday season.
Santa never stays in one place too long, as he’s always rushed to see everyone on his list. Our Santa dessert won’t be around for long either, so maybe you should make an extra batch or two.
Try making our chocolate reindeer cups! Nothing goes better with Santa than Rudolf!
This post includes links to purchase items you’ll need from our affiliates.
Mini Santa Desserts Recipe
Ingredients
- 1 box white chocolate candy cups
- 1 pkg vanilla candy melt discs
- 12 red candies, such as mini M&M’s or red hots
- 24 candy eyeballs
- 12 dragees, or 12 additional mini M&M’s, optional
- 8 oz whipped cream, or whipped topping, dairy or dairy-free
- 1 cup milk, variation: replace up to ¼ cup of milk with white chocolate or peppermint liqueur
- 1 3.4 oz box instant white chocolate pudding
- food coloring, red gel
Instructions
- The first thing to do is make an assembly line of all of the ingredients—that’ll guarantee the project will go smoothly.
- Combine the whipped cream or whipped topping and milk in a large bowl (or your stand mixer’s bowl) until completely combined.
- Sprinkle the instant pudding mix (it must be instant or this recipe won’t work) over the whipped cream mixture. Beat on low for 30 seconds then on high speed for 2 minutes, scraping the sides of the bowl often to make sure everything’s evenly incorporated.
- Once you have finished beating the mousse, cover the bowl with plastic wrap and place in the fridge until you’re finished making the Santa dessert cups.
- To assemble the Santa cups, remove about ¼ cup of the white candy melts, place them in a microwave-safe bowl and microwave for approximately 20 seconds, until completely melted. The melted chocolate acts as ‘glue’ to adhere the ‘facial features’ to the cordial cups.
- Cut 6 of the remaining white candy melts in half—this will give you 12 pieces that will be used as the mustache. Use a toothpick to apply a small amount of melted chocolate to the back (flat side) of the mustache as well as to the cordial cup so that the flat side of the mustache is even with the bottom of the cup. Hold it in place for just a few seconds until the chocolate glue sets then repeat with the remaining 11 cups.
- Once the mustaches have had a chance to set, apply a small amount of the melted chocolate glue to the back of a red candy then place the candy in the appropriate spot above the mustache (if the candy has a logo printed on it, just dab the glue on the side that has the logo so that it will not be seen). We really liked the look that we got by partially resting the nose on the mustache (as seen in the photo). You’ll need a little extra ‘glue’ to fill in the gap, but you should have more than enough melted chocolate. Repeat with remaining cups.
- Apply the melted chocolate to the back of the candy eyeballs and adhere them to the cups just slightly below the rim.
- Head to the fridge and get out the mousse. Transfer about 1/3 of it to a small bowl and add red food coloring until you achieve the color you desire for Santa’s hat. Load both the white and the red mousse into separate piping bags and get ready to fill the Santa cups.
- Begin with the white mousse and fill the cups to the top. Pipe an additional circle around the rim of the cup for the ‘fur’ on Santa’s hat.
- Switch to the red piping bag and begin piping in a circular motion and spiral toward the top, lessening the pressure as you get toward the top of the hat. When you reach the top of the hat, swirl the end to attach a dollop of white mousse or a dragee to look like a pom-pom.
- Chill in the fridge until ready to serve to a group of people that will not be able to stop talking about how cute they are.
Notes