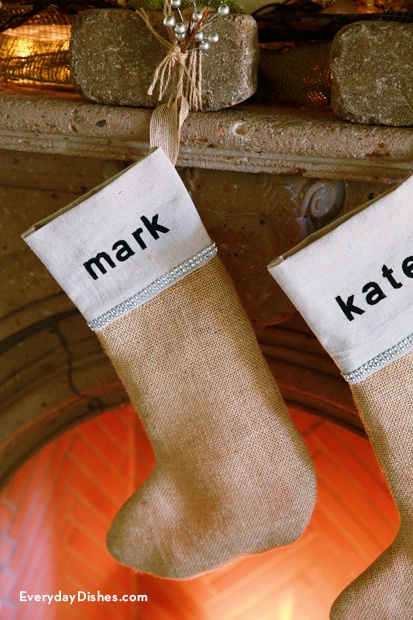
DIY burlap Christmas stocking
Tired of the same old green and red stockings hanging on the hearth? Get rustic style with a personal touch by creating a stenciled burlap Christmas stocking for each member of the family. It’s an inexpensive DIY project that uses burlap and drop cloth for a rustic appeal.
Once you’ve created your stocking template, you’re ready to sew. Show off your machine skills or sew by hand—you’ll be able to handle it.
Follow our directions and you’ll be ready to stencil names on the cuff in no time. Just plan your spacing of letters out before grabbing a brush—you want to be certain the name will be centered.
The final result is a professional looking stocking that is special to each and every family member.
Don’t forget the furry children—they’ll need a special treat in their stenciled burlap Christmas stocking as well!
- 1/2 yard [url href=”http://www.amazon.com/gp/product/B001BLJQB6/ref=as_li_qf_sp_asin_tl?ie=UTF8&camp=1789&creative=9325&creativeASIN=B001BLJQB6&linkCode=as2&tag=chery01-20″ target=”_blank” title=”Burlap”]natural burlap[/url] (48″ wide)
- 1/3 yard [url href=”http://www.amazon.com/gp/product/B0038ELUBS/ref=as_li_qf_sp_asin_tl?ie=UTF8&camp=1789&creative=9325&creativeASIN=B0038ELUBS&linkCode=as2&tag=chery01-20″ target=”_blank” title=”Drop Cloth”]canvas drop cloth[/url] or fabric of your choice
- tissue or parchment paper
- 2″ letter stencils
- black acrylic paint
- stencil or stipple brush
- 7/8″ [url href=”http://www.amazon.com/gp/product/B00BD1CUTO/ref=as_li_qf_sp_asin_tl?ie=UTF8&camp=1789&creative=9325&creativeASIN=B00BD1CUTO&linkCode=as2&tag=chery01-20″ target=”_blank” title=”Jute Ribbon”]jute ribbon[/url]
- decorative ribbon
- sewing supplies
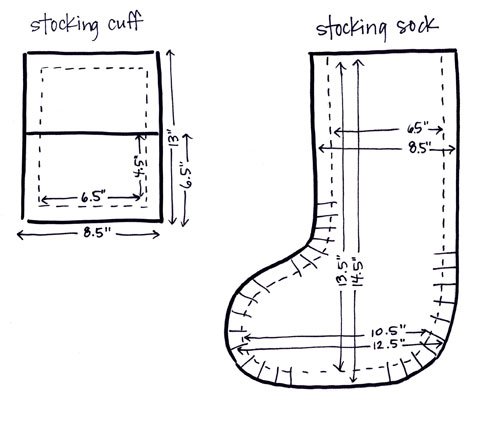
- Create stocking template on tissue or parchment paper with pencil using our illustration to the right (ruler and stocking drawing goes here).
- Wash and dry drop cloth; iron on cotton setting.
- Place cuff template on top of drop cloth and cut out (use tailor’s chalk if needed).
- Place sock template on top of burlap and cut out.
- Iron ½” seam allowance on both short ends of drop cloth cuff to create hem.
- Fold cuff in half and iron.
- Place top ½” of one burlap sock sandwiched between hem of cuff, pin in place.
- Sew with ¼” seam allowance from edge to edge.
- Repeat steps for other half of stocking.
- Place finished front and back of stocking together right sides facing, pin in place.
- Sew ¼” seam allowance around all sides leaving top of stocking open.
- Cut hatch marks at toe and heel to keep fabric from puckering when turned right-side out.
- Turn stocking right-side out.
- Cut 6″ of ribbon, fold in half bringing raw ends together to create loop.
- Pin loop to upper inside seam of stocking.
- Sew loop onto seam using a few extra rows of stitching for extra hold.
- Repeat for other stockings.
- Lay stocking on flat, hard surface.
- Place stencil vertically centered on stocking cuff (figure spacing before stenciling to be certain word is centered, mark lightly with pencil if needed).
- Pour small amount of paint into bowl (upcycle Greek yogurt cups for paint bowls).
- Dip stencil brush in paint and dab excess onto paper towel.
- Hold stencil in place with one hand, begin painting in tapping motion.
- Tap stencil brush on fabric in an up-and-down tapping motion to achieve best results.
- Let each letter dry before moving to next.
- Wipe stencil clean with damp paper towel to remove excess paint and prevent smudging.
- Let dry.