Halloween Gravestone Cookies Recipe
There is no fun food on the planet easier to make than these Halloween gravestone cookies! These cookies are sure to be a hit at the monster mash!
Ingredients
- 12 rectangular-shaped sandwich cookies
- 12 oz package white candy melts
- food coloring black oil-based
- 1 tube black gel icing
- toothpicks
Instructions
- Melt candy in a microwave-safe bowl according to package instructions. Stir candy melts to ensure they are completely melted, then add a few drops of oil-based black food coloring. Don’t use regular food coloring—the water-based ingredient will cause the candy to seize up and become unusable. When you have achieved a satisfactory, uniform gray color, add 2 extra drops of food color then give it just a few stirs, but no more! The black streaks in melts is what creates the marbled effect.
- Lay a sheet of parchment or wax paper near your work surface to rest cookies on after they are dipped.
- Dip cookies into melted candy, coating the cookie completely. Use a fork to assist covering the cookie melted candy then gently lift the cookie out of the bowl. Tap the fork gently on the side of the bowl several times to remove excess candy and smooth out the surface. Transfer cookie to parchment paper and let candy set. Repeat with remaining cookies.
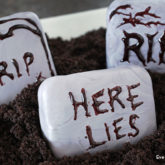
- Allow candy to set completely, then use black gel icing to write on the gravestones. Don’t worry if it doesn’t look perfect, you can go back over it with a toothpick to refine the look. Pipe on cracks or spider webs if desired then use a toothpick to pull the icing into thin lines. Let cookies set for just a few minutes, then enjoy!
Notes
Serve the cookies nestled in a bed of finely-crumbled chocolate cookies so they really look like gravestones!
Nutrition
Calories: 267kcal | Carbohydrates: 34g | Protein: 2g | Fat: 14g | Saturated Fat: 11g | Polyunsaturated Fat: 0.2g | Monounsaturated Fat: 1g | Trans Fat: 1g | Sodium: 93mg | Potassium: 19mg | Fiber: 0.3g | Sugar: 31g