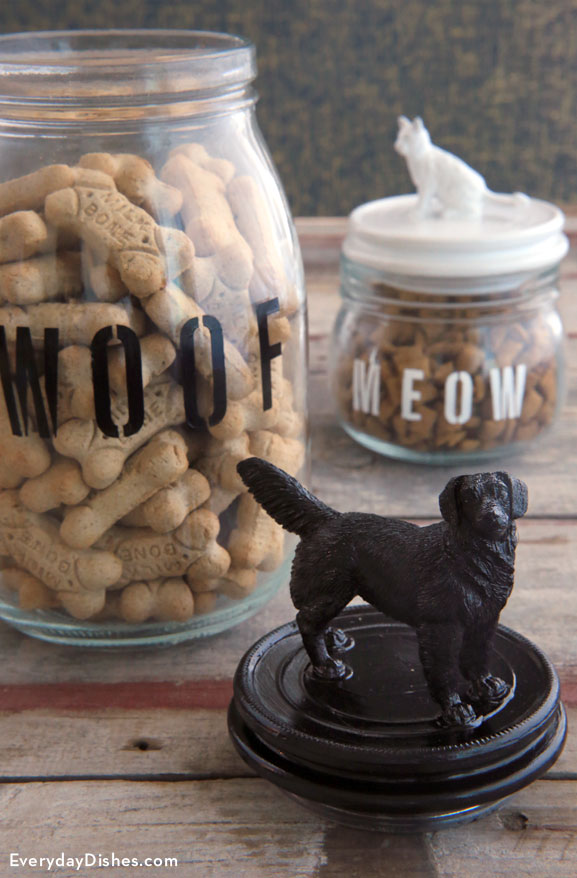
Pet Treat Jar
Tails will be wagging when you hand out biscuits from your own DIY dog treat jar. Not only is it functional, but it is super cute—you can stencil whatever you want on it and paint it a color that matches your décor.
Head to your local craft or dollar store to find just the right resin animal that best represents your pet. Whether you have a golden retriever or a mutt, there’s sure to be one that fits the bill.
We wanted to be able to lift rather than twist off the lid, so we used a jar with a clamp lid and removed all the hardware. Industrial-strength glue works on a variety of materials, so it’s the perfect choice for this project. It will hold the toy securely in place to survive all of the workouts it’s going to get.
Glass paint can be baked or air-dried 21 days to cure, so plan this project well in advance. Obviously the plastic animal can’t be baked so you’ll have to air-dry the finished lid.
This post includes links to purchase items you’ll need from our affiliates.
Treat jar instructions
- clamp lid jar
- pliers
- toy animal ([url href=”http://www.amazon.com/gp/product/B00B3YH9C4/ref=as_li_qf_sp_asin_il_tl?ie=UTF8&camp=1789&creative=9325&creativeASIN=B00B3YH9C4&linkCode=as2&tag=chery01-20&linkId=B4HROIT7WYCPCB4S” target=”_blank” title=”Resin dog”]dog[/url] or [url href=”http://www.amazon.com/gp/product/B000GYWYFE/ref=as_li_qf_sp_asin_il_tl?ie=UTF8&camp=1789&creative=9325&creativeASIN=B000GYWYFE&linkCode=as2&tag=chery01-20&linkId=D7GJ7TW24KSD4TWV” target=”_blank” title=”Resin cats”]cat[/url])
- [url href=”http://www.amazon.com/gp/product/B004BPHQWU/ref=as_li_qf_sp_asin_il_tl?ie=UTF8&camp=1789&creative=9325&creativeASIN=B004BPHQWU&linkCode=as2&tag=chery01-20&linkId=25T7M7NJ7Q2327HM” target=”_blank” title=”E6000″]industrial-strength glue[/url]
- [url href=”http://www.amazon.com/gp/product/B009LWR3HG/ref=as_li_qf_sp_asin_il_tl?ie=UTF8&camp=1789&creative=9325&creativeASIN=B009LWR3HG&linkCode=as2&tag=chery01-20&linkId=5SWG22DDOAJFDDV3″ target=”_blank” title=”Glass adhesive stencils”]glass adhesive letter stencils[/url]
- glass paint
- brush
- Remove hardware from jar using pliers.
- Glue toy animal to lid using industrial-strength glue then set aside to dry for a few hours or overnight.
- Place adhesive letter stencils onto jar, brush on glass paint then peel off letters and allow them to dry.
- Bake jar according to instructions on glass paint container or allow it to cure for 21 days.
- Paint jar lid and animal and allow it to dry and cure for 21 days.