DIY bridesmaid box
One of the best parts of a bridesmaid box DIY is that you can take it any direction you want. Consider including jewelry, hair accessories, nail polish or other items that your bridesmaids could use on the wedding day.
We’ve created a printable for the bunting to get you started. There are three versions that include Matron of Honor, Maid of Honor and Bridesmaid, so we have you covered!
Just download the free printable, print and cut it out then glue (or sew if you’re up to it) to decorative paper. The rest is up to you! Have fun with this and think of your girls as you put it together.
DIY bridesmaid box
Ingredients
- bunting
- Everyday Dishes & DIY bunting printable
- card stock
- scrapbook paper
- X-acto knife
- ruler
- cutting mat
- double-sided tape
- sewing machine
- paper dresses
- jumbo paper clips
- needle nose pliers
- card stock (in the color(s) of dresses you want your attendants to wear)
- scissors
- embellishments (optional)
- hot glue gun
- kraft colored card stock
- small letter stamps and stamp pad
- X-acto knife
- string
- box
- wooden box
- scrapbook paper
- X-acto knife
- ruler
- cutting mat
- decoupage glue
- disposable foam brushes
- hot glue gun
- copies of photos
- letters and other embellishments
- chocolates, small bottles of liquor, nail polish or other sundries
- ribbon (optional)
Instructions
bunting
- Download the Everyday Dishes & DIY bridesmaid bunting printable OR Everyday Dishes & DIY maid of honor bunting printable OR Everyday Dishes & DIY matron of honor bunting printable.
- Cut out using X-acto knife, ruler and cutting mat.
- Cut out larger triangular shapes from scrapbook paper using a printable cutout as a guide (about ½” larger on all 3 sides).
- Glue printable to center of scrapbook paper (to hold bunting pieces in place when it goes through sewing machine).
- Sew bunting together, leaving about ½” between each piece of bunting.
- Accordion fold completed bunting together, making sure to leave ‘will’ piece facing up.
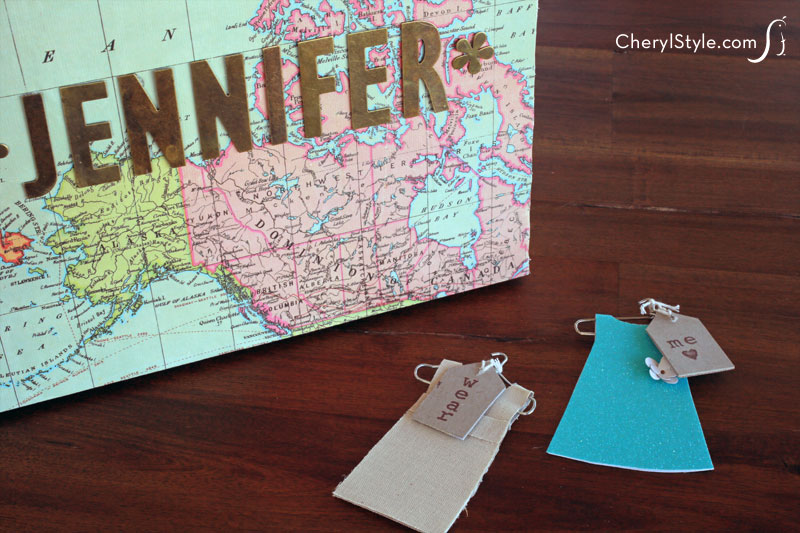
paper dresses
- Unfold paperclip to fashion it into a hanger, using needle nose pliers.
- Fold piece of card stock in half (folded size should be the size you want the paper dress to be).
- Cut a dress shape, leaving fold intact.
- Apply 2 small dots of hot glue to top of hanger (to hold dress in place when it’s hung).
- Slip dress over top of hanger.
- Apply hot glue along edge of dress interior, press together.
- Add small embellishments with hot glue if desired.
- Cut small tag out of kraft card stock.
- Stamp ‘wear’ on front, ‘me’ on back.
- Cut an ‘x’ in top of tag using X-acto knife and push string through, using X-acto if necessary.
- Tie string to hanger.
box
- Cut paper to fit interior top and bottom of box using X-acto knife, ruler and cutting mat then coat interior of box with decoupage glue using disposable foam brushes.
- Insert paper, press into edges and corners of box then apply coat of decoupage glue to the paper, allow to dry then repeat.
- Cut paper to fit exterior of box using X-acto knife, ruler and cutting mat then coat exterior of box with a layer of decoupage glue.
- Wrap paper around box; smoothing it down with your fingers then apply another coat of decoupage glue to paper, allow to dry then repeat.
- Embellish interior and exterior of box with copies of photos, letters and other items to personalize it.
- Fill with her favorite things, place mini dresses and bunting on top, wrap and tie with ribbon.
Notes
Are you sewing machine challenged? Use a hole punch and ribbon to connect the bunting together.