Hanging jewelry organizer
Whether you enjoy making jewelry or would just rather shop for it, this stylish hanging jewelry organizer will keep everything tangle-free and within reach.
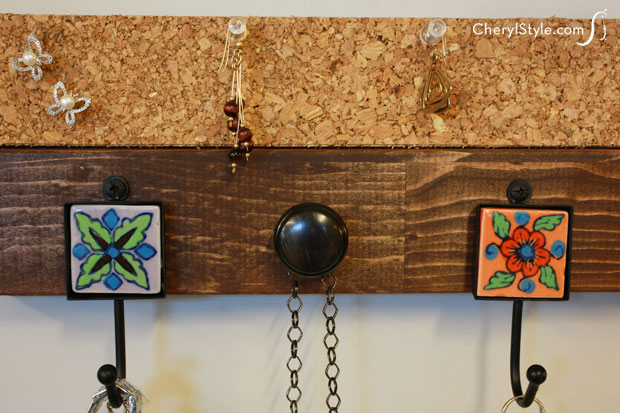
You can use a scrap wood but if you head to your home improvement store, you’ll discover something called a ‘filler exterior head jamb’ in the lumber aisle. It’s three feet long and used for door installations but the upper portion is recessed so it’s perfect for a strip of cork on which earrings can be hung.
Ask a salesperson to cut it in half at the store’s cutting station so the sawdust stays at the store. It’s long enough to make two organizers—one for you and the other as a gift!
Check out the selection of inexpensive cabinet pulls. They can be purchased individually and the hardware’s included—just make sure the machine screw won’t protrude from your wood.
This post includes links to purchase items you’ll need from our affiliates.
- Masonite 3″ x 4 9/16″ x 1 ¼” filler exterior head jamb, cut to 18″
- sandpaper
- disposable gloves
- stain
- rags
- 18″ ruler and pencil
- ⅜” thick cork, cut 18″ x 2″
- X-acto knife
- [url href=”http://www.amazon.com/gp/product/B007TSYNG8/ref=as_li_qf_sp_asin_il_tl?ie=UTF8&camp=1789&creative=9325&creativeASIN=B007TSYNG8&linkCode=as2&tag=chery01-20&linkId=DE4NZA2VP5ZWVQGV” target=”_blank” title=”E6000″]industrial-strength glue[/url]
- hammer
- 2 [url href=”http://www.amazon.com/gp/product/B002CN4P2W/ref=as_li_qf_sp_asin_il_tl?ie=UTF8&camp=1789&creative=9325&creativeASIN=B002CN4P2W&linkCode=as2&tag=chery01-20&linkId=NFORBT435DBZWGTB” target=”_blank” title=”Saw Tooth Hangers”]saw tooth hangers[/url]
- decorative hooks and cabinet knobs
- drill
- paint and artist’s brush
- push pins
- Remove the weatherstrip (if there is any) and sand the head jamb with a fine grit sandpaper to eliminate any rough edges.
- Next, grab your disposable gloves, stain and a small rag. It’ll take only a few minutes to rub on the stain. Use a clean rag to wipe off the excess stain then allow the board to dry completely.
- Measure and cut cork to fit the recessed upper portion of the board, using a ruler and X-acto knife. Apply craft adhesive to one side of the cork and onto the portion of the board on which it is to be glued. Wait a few minutes for it to get tacky then adhere the cork to the board and press firmly into place—you may want to clamp it or weigh it down with a heavy object until it dries.
- Once the cork is firmly in place, flip the board over and lightly hammer a saw tooth hanger in place at each end. Arrange your hooks and knobs as desired then mark the positions of only the knobs. Carefully predrill holes for them then screw in the machine screws by hand so the wood doesn’t split.
- Flip the board over right side up then twist the pulls on the machine screws until flush with the board. Space the hooks evenly apart from the pulls, mark their positions then drill starter holes for each. Attach the hooks with screws and paint the heads to coordinate with the hooks—we made ours black.
- Hang your organizer on the wall, place push pins in the cork then sort through your jewelry and get busy!