DIY kids travel organizer
Want to make your next car ride with the kids easier? Our DIY kids travel organizer is sure to make any trip more enjoyable for all of you.
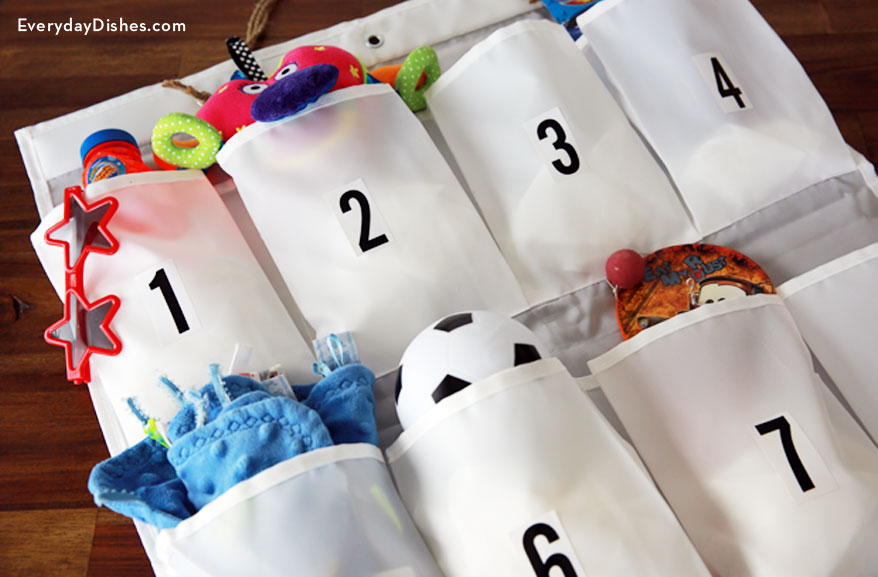
An over-the-door shoe organizer, cut down to two rows of pockets, provides great storage for crayons, small toys and travel games.
Decorate pockets with designated numbers for kids to share or make an organizer for each child. Use jute twine or ribbon to hang it around the headrest and watch the clutter disappear.
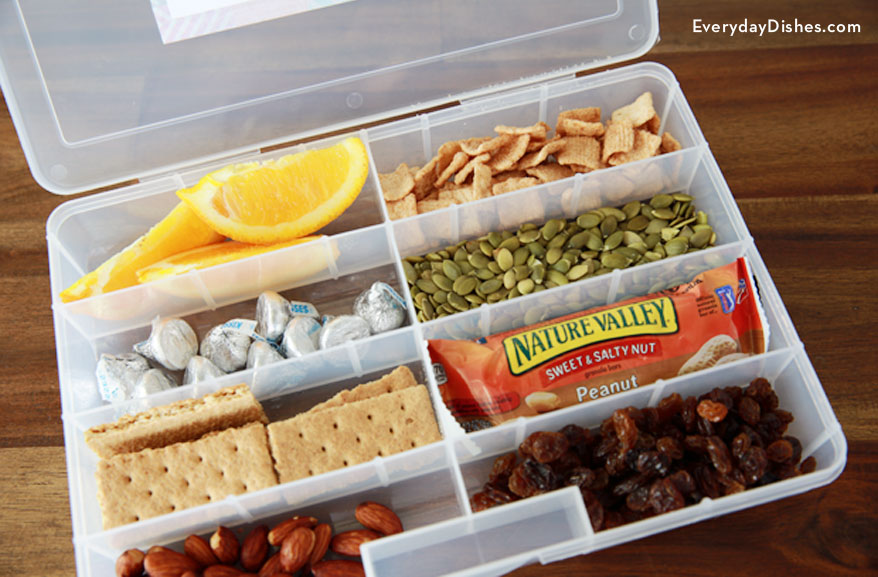
Tired of passing snacks back to the kids while driving? Be safe and monitor what they eat at the same time with a travel snack box.
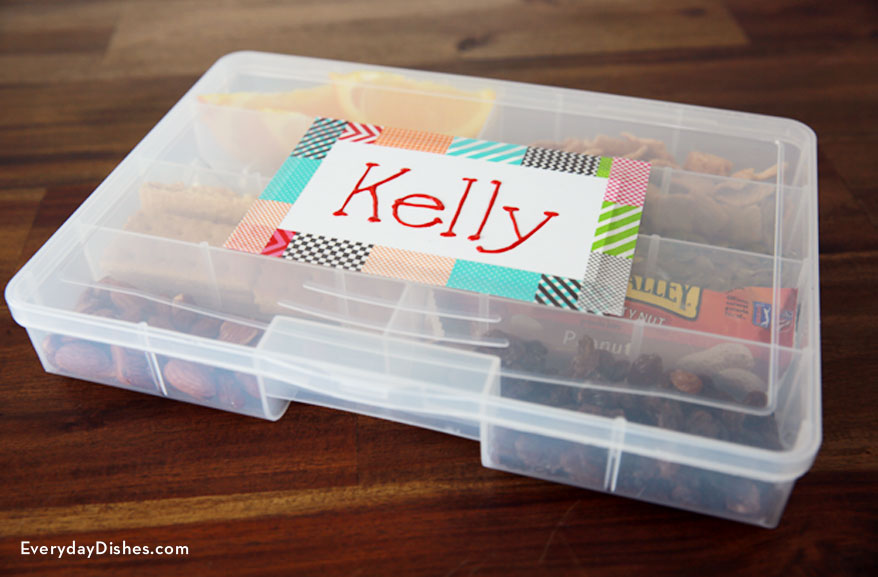
Personalize a jewelry organizer (one for each child) using note cards and puff paint to eliminate problems sharing.
Our two DIY kids travel organizers are super easy, inexpensive and guaranteed to make your next road trip a better experience.
This post includes links to purchase items you’ll need from our affiliates.
DIY kids travel organizer instructions
- car travel organizer
- [url href=”http://www.amazon.com/gp/product/B001F51AHG/ref=as_li_qf_sp_asin_il_tl?ie=UTF8&camp=1789&creative=9325&creativeASIN=B001F51AHG&linkCode=as2&tag=chery01-20″ target=”_blank” title=”Over the Door Shoe Organizer”]over the door shoe organizer[/url]
- jute rope or 1” wide ribbon
- [url href=”http://www.amazon.com/gp/product/B0027624VS/ref=as_li_qf_sp_asin_il_tl?ie=UTF8&camp=1789&creative=9325&creativeASIN=B0027624VS&linkCode=as2&tag=chery01-20″ target=”_blank” title=”2″ Black Vinyl Numbers & Letters”]number stickers[/url]
- scissors
- travel snack box
- [url href=”http://www.amazon.com/gp/product/B000JKZGLY/ref=as_li_qf_sp_asin_il_tl?ie=UTF8&camp=1789&creative=9325&creativeASIN=B000JKZGLY&linkCode=as2&tag=chery01-20″ target=”_blank” title=”8-Compartment Jewelry Organizer”]8-compartment jewelry organizer box[/url]
- [url href=”http://www.amazon.com/gp/product/B00CBNMUSY/ref=as_li_qf_sp_asin_il_tl?ie=UTF8&camp=1789&creative=9325&creativeASIN=B00CBNMUSY&linkCode=as2&tag=chery01-20″ target=”_blank” title=”Washi Tape”]washi tape[/url]
- notecard
- pencil
- puff paint
- Remove hooks from eyelets on organizer.
- Determine length of rope needed to wrap around car headrest and allow organizer to hang comfortably.
- Thread rope through eyelet nearest edge and tie double knot to secure one end of rope. Repeat steps for other eyelet.
- Lay organizer on flat surface and cut straight line just beneath second row of pockets but be careful not to cut through bottom of pocket (you won’t need the entire shoe organizer so cut in half and make 2 travel organizers).
- Embellish pockets with numbers or specific pocket names
- Slip rope around headrest so organizer is on back of seat and facing child (you can also remove your headrest or adjust length of rope if necessary).
- Have fun reducing car clutter and teaching your kids how to tidy up!
- Remove all labels then wash and dry snack box in warm, soapy water.
- Place note card white side up centered on lid of snack box and tape all 4 edges using washi tape to secure.
- Pencil child’s name on note card then outline name with puff paint. Let dry 1-2 hours.
- Fill compartments with healthy snacks, treats and small toys for road trip.