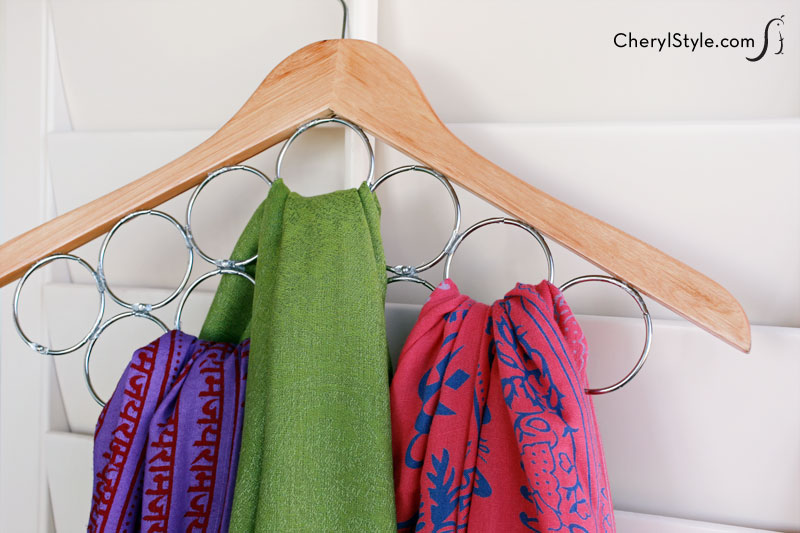
DIY scarf hanger
Are you a secret scarf hoarder? Are they wadded up in drawers or piled in the bottom of your closet? Whether you’ve got an entire collection or just a few, you’ll want to make our DIY scarf hanger.
First, check your coat closet for one of those nice wooden hangers—we know you’re bound to find one! If you have none to spare, just head to your local discount store. While you’re there, pick up a pack of metal upholstery or shower curtain rings. Get a variety of sizes—small ones for lightweight, summer scarves and large ones for heavier, thicker scarves.
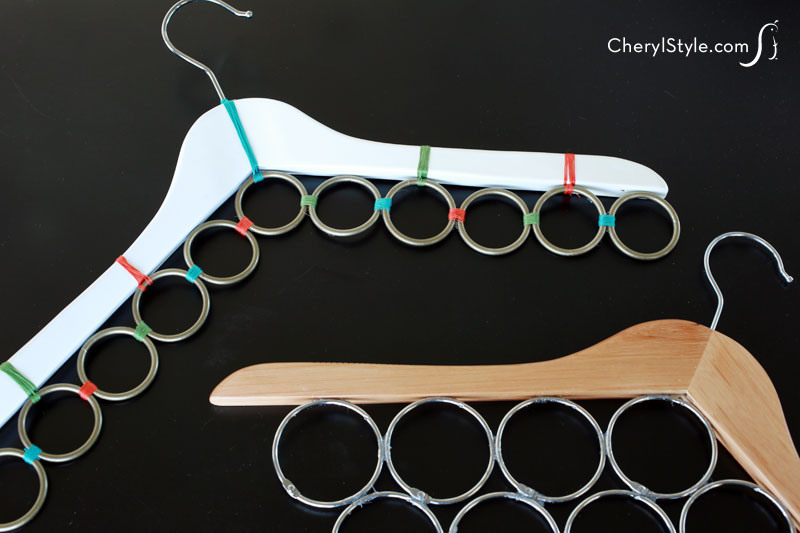
Our instructions provide two options to attach the rings to the hanger. If you’ve made more than one row of rings, glue them to the hanger using a process similar to that already mentioned. A mini bar clamp will make the job go smoothly.
If you’ve made only a single row of rings, the second option calls for binding them to the hanger by first wrapping thread or embroidery floss around the glued portions of each ring—a dab of glue will secure the thread in place. Once wrapped, repeat the process to attach the rings to the hanger.
Embroidery floss not only acts as reinforcement, but also adds color and protects your scarves from snags that might otherwise occur, so consider using it for a decorative touch no matter which option you use to complete this DIY.
You’ll no longer have trouble finding just the right scarf to accessorize your outfit—they’ll stay organized, easily accessible and wrinkle-free on a cool looking scarf hanger that actually works!
This post includes links to purchase items you’ll need from our affiliates.
How to make a DIY scarf hanger
- wooden hanger
- waxed paper
- pencil
- metal drapery or shower curtain rings
- needle nose pliers (if needed)
- permanent marker
- permanent adhesive
- several toothpicks
- mini bar clamp (if needed)
- thread or embroidery floss (if needed)
- hot glue gun
- scissors
- Place hanger on waxed paper, trace shape of hanger bottom, set hanger aside.
- Bend clips off rings with needle nose pliers.
- Arrange row of rings on wax paper, aligning them with your tracing.
- Set remaining rings in place, if desired.
- Mark contact points on each ring with permanent marker.
- Squeeze small amount of permanent adhesive on waxed paper.
- Use toothpick to apply adhesive to marks on rings, let adhesive partially cure for 10 minutes.
- Push rings together to adhere to one another.
- Apply additional adhesive with toothpick, if necessary.
- Allow adhesive to cure 24−48 hours (be careful not to move them).
- Attach rings to hanger.
- NOTE: this method works only if you have multiple rows of rings glued together.
- Line rings up to hanger, mark contact points on rings and hanger with marker. Squeeze small amount of adhesive onto waxed paper.
- Use toothpick to apply adhesive to marks on rings and hanger, let adhesive partially cure 10 minutes.
- Push rings and hanger together, hold in place several minutes until bond occurs.
- Clamp hanger and rings together, allow to cure 24−48 hours.
- Wrap rings with thread or embroidery floss (optional, see below).
- NOTE: this method MUST be used if you have a single row of rings (rings that are glued together in only one place) or can be added as a decorative element to option 1 for pops of color.
- Cut approximately 2½ yards of thread or floss.
- Fold thread in half, fold in half again then fold a 3rd time.
- Wrap loop end of thread around glued section of 2 rings.
- Feed other end of thread through loop, pull tight to secure thread to rings.
- Wrap thread around glued section until it finishes on backside of rings then secure in place with small dot of hot glue.
- Repeat until all rings are bound together.
- Repeat same instructions to bind rings to hanger.