Coffee can bird feeder
Are you looking for cheap and easy ways to spruce up your backyard? Then this coffee can bird feeder craft is for you!
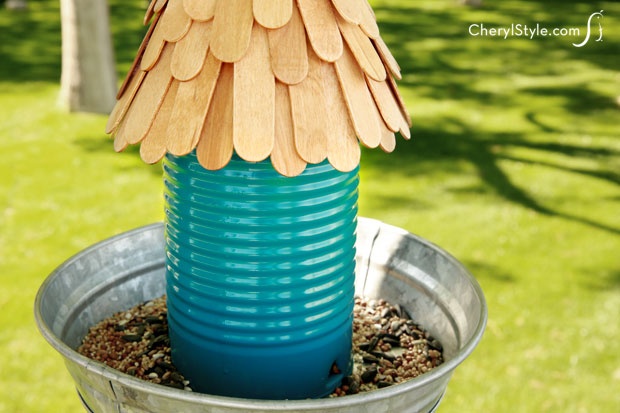
To make this bird feeder, simply upcycle a tin coffee can (no lid needed) and a galvanized tray or pie tin. You’ll need craft sticks to decorate and some hardware to hang it up when you’re done.
We used an old galvanized tray we found to catch the seed and give the birds a place to perch, but a pie tin would work just as well. You could also use a ceramic plate or terra cotta planter saucer. Just make sure to use a drill bit that is meant for drilling the type of material you choose and the correct hardware to support the weight of your bird feeder.
Once your bird feeder is complete, simply fill it up and hang it on a branch of your choice.
This coffee can bird feeder craft is easy to make and if you keep the wood roof protected from the elements with marine varnish, it will last for years.
- craft foam sheet
- tin coffee can
- hot glue gun and glue sticks
- scissors
- wooden craft sticks (number determined by size of roof)
- stain
- paper towels
- heavy duty scissors
- marine varnish
- can punch
- drill with drill bit (determined by diameter of eye bolt)
- metal pie tin or galvanized plant pot saucer
- eco-friendly [url href=”http://sugarartistsacrylic.com/” target=”_blank” title=”spray paint”]spray paint[/url]
- hardware: 1 eye bolt, 2 hex nuts, 1 fender washer, 2 flat washers, 1 coupling nut and 1 threaded rod (all of these should be the same diameter and once assembled should be long enough to go from the top of the roof through the bottom of the tin)
- spring link
- rope
- Wrap craft foam around end of your coffee can to form your cone-shaped ‘roof.’ Glue to hold the shape together and trim with scissors until you get the size and shape you want for your roof.
- Stain wooden craft sticks by dipping them in varnish then wipe with a paper towel. Set them on paper to dry thoroughly then snip in half with heavy duty scissors.
- Begin gluing the craft sticks to the cone, starting at the bottom—make sure to leave an overhang of approximately ¼”. Once you’ve gone all the way around, begin a second layer, gluing the craft sticks so they overlap the space between those in the first layer. Note that you will trim the craft sticks shorter as you glue each row—the top row’s craft sticks will measure about ½–3/4″.
- Make sure to leave a large enough hole at the rooftop to accommodate the diameter of the eye bolt. Once the roof is complete, coat with marine varnish (following product instructions) to protect the wood.
- Drill a hole through the center of the bottom of the can—be sure the drill bit is large enough to accommodate the eye plate bolt. Next, drill a hole in the center of the pie pan.
- Use a can punch to punch 3 holes along the outside rim of the open end of the can. The open end of the can will actually be the bottom of the birdhouse and the holes will be where the birds get the seed.
- Next, spray paint the exterior of the can, following label instructions. Use more than one coat of paint if necessary then allow it to dry thoroughly.
- Now it’s time to assemble your feeder. Screw a hex nut onto the eye bolt and feed the fender washer on so that it fits snuggly against the hex nut. Place the eye bolt through the opening of the roof then feed a washer onto the end. Screw a coupling nut on tightly to the washer—make sure to keep the washer level. Next, screw the threaded rod into the coupling nut, screwing in as far as necessary to achieve the length you need—you may have to play around with all the hardware to get the proper fit. Feed the rod through the hole you made in the coffee can. The craft foam should ‘grip’ the can and help keep it in place.
- Turn bird feeder upside down and fill with birdseed. Stuff a little bit of paper towel into feed openings to prevent seed from spilling out while assembling. Feed the pie pan onto the bolt, add the washer then screw hex nut on tightly. Turn bird feeder right side up and make sure it’s straight. Make adjustments if necessary.
- The final step is to clip the spring link to the eye hook at the top. Tie the rope to the spring link, remove paper towel plugs then hang from a tree limb.
- When bird feeder is empty, simply unhook the feeder from the spring link, unscrew the nut from the bottom of the feeder, remove pie pan and washer then fill with birdseed. Reassemble, screw nut into place and hang up again.