DIY Braided Dog Collar Video
Here at Everyday Dishes it’s hard not to find a dog lover—we each have at least 2, and some of us just don’t know when to quit! Nothing’s too good for our furry family members so it’s no wonder we came up with a braided dog collar to keep each one in style.
Weaving the dog collar is not difficult once you get the hang of it. Plus, our resident visual overlord Audrey made a video to help you out.
Your pooch will be runway ready and the envy of the neighborhood, especially with our matching DIY Shrinky Dinks dog tags!
DIY braided dog collar instructions
DIY Braided Dog Collar Instructions
Ingredients
- size chart
- paracord, 1 solid colored and 1 patterned
- measuring tape
- scissors
- plastic buckle
- lighter
- tape
Instructions
- Download the braided dog collar size chart.
- Grab a measuring tape to determine the length. You’ll need to cut 2 strands of paracord—1 solid and 1 patterned. Make sure to add an additional 2″ before whipping out your scissors.
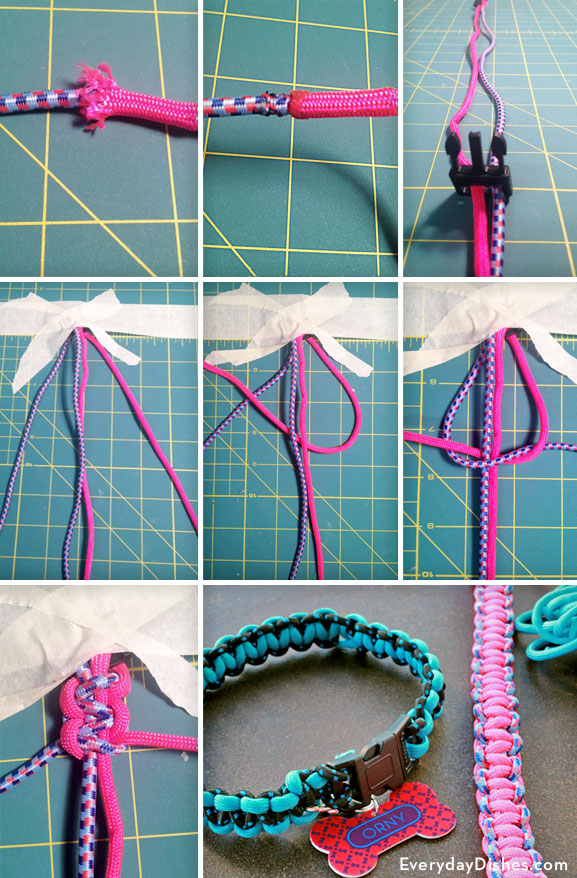
- Next, thread the solid colored cord through the end of the ‘female’ buckle (the one that’s flat without prongs). Strip off a few inches of the outer cover of the cord then cut off the inner white strings.
- Push the patterned cord inside the stripped cord as far as possible then use a lighter to fuse the ends together, burning them a little bit at a time. We suggest using the back of the lighter to press them together—you don’t want to burn your fingers!
- Refer to our photo to see how to loop both cords through the buckle to make a knot. Pull the ends of both cords through the ‘male’ buckle (the one with the prongs), making sure the ‘good’ sides of both buckle parts are facing up.
- Measure the cords including both buckle parts to the desired length of your collar (ours is 12″) and tape both ends to a work surface so there are 4 cords, organized from left to right—patterned, patterned, solid, then solid again.
- Starting with the solid colored cord on the right, weave it under the 2 middle cords and over the top of the patterned cord.
- Make the patterned cord on the left and weave it over the 2 middle cords and through the loop of the solid cord. Tighten to form a knot.
- Start the next braid using the solid colored cord to go under the 2 middle cords and through the loop of the patterned cord.
- Repeat, making sure the solid colored cord always goes under the middle cords and over the patterned cord. When you reach the male buckle, tie a knot, burn the ends carefully to avoid fraying and call your dog to try it out!
Notes
Remember to always weave the solid colored paracord under the middle cords and you won’t go wrong.