DIY Wall-Mounted Bottle Opener
What’s a man cave without a wall-mounted bottle opener?
There are quite a few materials and steps required, and it’s not particularly inexpensive, but that’s why it makes a great present for a special occasion.
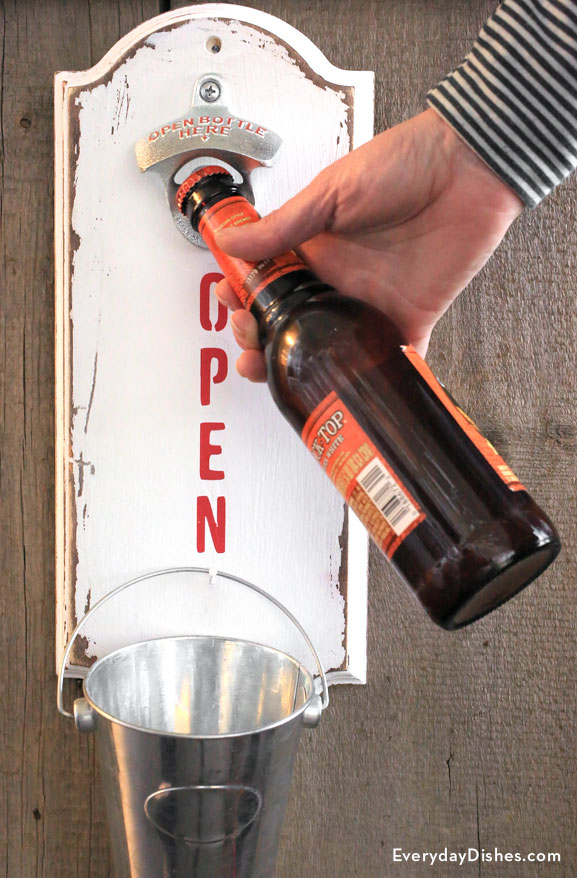
We included an optional ‘Open’ stencil in the template, too, in case you wanted to add some fun flair. The bucket is super easy to remove when you need to empty bottle caps. You can even use a small cup hook instead of a nail to hold it.
Wondering how to countersink a hole? You’ll need a special drill bit to do this. Otherwise, you can drill a starter hole and then drill a recess so that the screw head sits flush to your wooden surface.
Then, drive in the screw and insert a plug to cover it if needed.
This post includes links to purchase items you’ll need from our affiliates.
Wall-mounted bottle opener instructions
- wooden plaque, 6″ x 14″
- sandpaper, fine grit
- wood stain
- brush or rags
- white paint and brush
- sandpaper, coarse grit
- bottle opener stencil template
- card stock
- precision knife
- spray adhesive
- red spray paint
- wall bottle opener
- drill and bits (countersink optional)
- screws
- nail
- hammer
- Sand any rough edges of the wooden plaque and wipe clean. Apply your choice of colored wood stain using a brush or rag then allow it to dry.
- Using a clean brush, apply a coat of white paint over the stain. Allow it to dry then sand the edges for a distressed look. Wipe plaque clean and set aside.
- Download the bottle opener stencil template and open in Adobe Reader. Print on card stock and cut out using a precision knife.
- Apply spray adhesive on the back of the stencil then center on the plaque, leaving enough room for the bottle opener at the top and the bucket on the bottom. Protect areas not to be painted then spray the stencil with red paint and allow it to dry.
- Place opener near top of the plaque and screw into place, using a drill.
- Mark a hole on the plaque just above the opener and a second hole near the bottom of the plaque. Drill holes for the screws. Countersink, if desired, to make screws flush with plaque.
- Just below the stenciled letters, center a small nail on which to hold the bucket and hammer in place—be sure to hammer it in at an angle.
- Screw plaque into wall then hang bucket on nail. Grab your favorite brew and pop open.