DIY cardboard Christmas tree
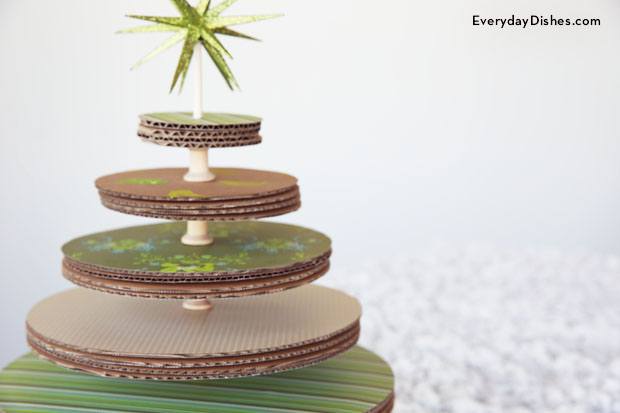
Don’t throw away those mailing boxes you’ve been getting! Upcycle them by creating this DIY cardboard Christmas tree. You can also use cardboard cake circles at your local craft or cake decorating store.
No heavy-duty tools are required to construct this project—just a ruler, paper awl, X-acto knife and hot glue gun.
Follow our cardboard Christmas tree directions to cut circles and decorate them with patterned scrapbook paper. For a different effect, paint or stamp the circles instead of using scrapbook paper.
Stack wooden spools alternating with cardboard circles, using a dowel as support. Top with a decoration of your choice and your DIY cardboard Christmas tree is complete!
DIY cardboard Christmas tree instructions
Ingredients
- 6 ¾” wood plaque circle
- ¼” x 13” wood dowel
- corrugated cardboard circles (purchase or upcycle mailing boxes)
- 8 – 6” cardboard circles
- 4 – 8” cardboard circles
- 4 – 10” cardboard circles
- 4 – 12” cardboard circles
- 6 kraft wood spools with ¼” center hole
- X-acto knife
- ruler
- hot glue gun and glue sticks
- paper awl
- 5 sheets pattern scrapbook paper
- spray adhesive
Instructions
- cut 4 – 3 ½” circles from the 6” cardboard circles
- mark center of circles (you only need to mark one of each size)
- gather all 4 of each size circle and put on hard surface (put the one circle with the center mark on top)
- push down on center mark with paper awl to make hole (wiggle the awl to create a slightly larger hole for the dowel)
- continue for all circle sizes
- trace 1 circle of each size on scrapbook paper with pencil
- cut out and spray back of paper with adhesive (follow directions on adhesive can) and attach to top of circle grouping
- re-punch hole in center of scrapbook paper using awl
- mark center of wood base
- glue spool to center of base using hot glue
- glue another spool
- put dowel in center of spools
- thread all 12” circles onto dowel
- thread another spool on dowel
- continue threading all 10”, 8”, 6” and 4” circles with spools between each size
- glue decoration on top with hot glue
Notes
Choose a color scheme for your cardboard Christmas tree that highlights your holiday décor.