DIY clip-on bow tie
If you’re a sucker for a bow tie, then dress up the kids easily and inexpensively with our clip-on bow tie craft made just for kids.
What’s great about this project is that you can use old scraps of fabric and strips of ribbon from your craft closet—and while you do need a needle and thread, there is absolutely no fancy sewing involved—score!
Mix and match colors and patterns for the little gentleman in your life. This tutorial comes in handy not just for your own brood; our bow tie craft also makes a creative gift!
This post includes links to purchase items you’ll need from our affiliates.
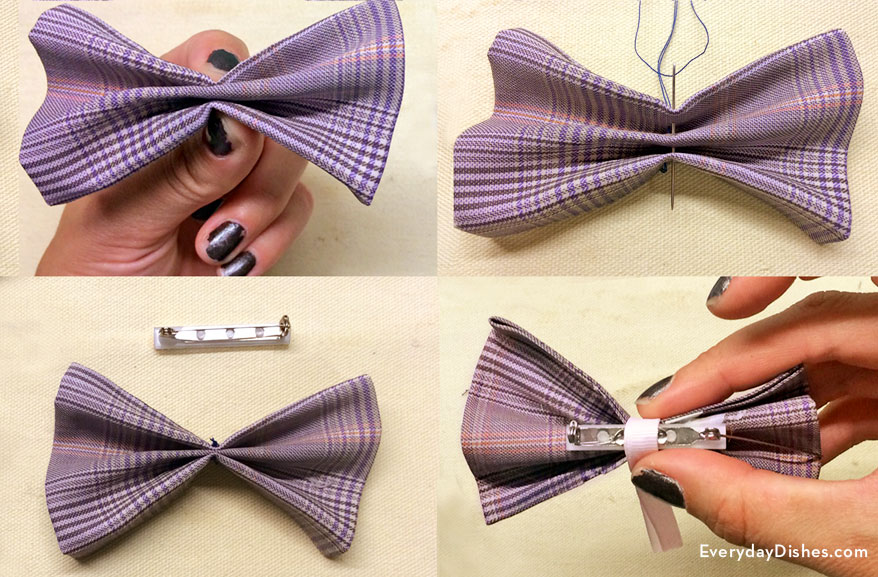
How to make a clip-on bow tie
how to make a clip-on bow tie
Ingredients
- 7½” x 4″ piece of scrap fabric
- [url href=”http://www.amazon.com/gp/product/B001144X3E/ref=as_li_qf_sp_asin_il_tl?ie=UTF8&camp=1789&creative=9325&creativeASIN=B001144X3E&linkCode=as2&tag=chery01-20&linkId=H7HBD5Z5OVHYRSVH” target=”_blank” title=”Thermal adhesive”]adhesive thermal tape[/url], ⅜” wide
- iron
- needle and thread
- 1½” glue-on bar pin back
- ribbon
- hot glue gun
Instructions
- Lay fabric horizontally on a flat surface with the ‘good’ side facing down. Cut two 7″ strips of adhesive thermal tape. Leaving a ⅜” seam allowance, place tape along the top and bottom edges of the fabric. Bond tape to fabric according to package instructions. Fold unfinished edge over tape then secure in place using a hot iron.
- Next, fold the long sides of the rectangle toward the middle then secure using adhesive thermal tape. Using your fingers, fold and pinch fabric into bow tie shape then secure in place with a needle and thread.
- Attach bar pin back to the back of bow tie using hot glue. Once dry, wrap ribbon around the center, adhering with hot glue. Set aside to dry.
Notes
Even though bow ties are for the boys, we think they’re pretty darn adorable on the girls too!