Dyed cornhusk witch
Few things are as satisfying for us creative types as decorating our homes with our handmade projects. Halloween is an especially great time to get crafty. This year, we got crazy with fabric dye to make an awesome DIY dyed cornhusk witch in black and orange.
Dying the cornhusks adds more Halloween spirit and dye ensures the color stays true once it’s dry. You’ll want to wear rubber or disposable gloves during the dyeing process and work on a covered surface then just glue and secure!
As far as the gluing goes, you’ll want to work quickly because the hot glue dries relatively fast. Having glue sticks on hand for this project is a good idea, too.
Speaking of husks, they are very easy to work with once they are soaked in dye and become more pliable. If they start to dry out, just soak them in water for about 10 minutes to make them soft again.
This post includes links to purchase items you’ll need from our affiliates.
- fabric dye (black and orange)
- 16 oz [url href=”http://www.amazon.com/gp/product/B0000GKVXU/ref=as_li_qf_sp_asin_il_tl?ie=UTF8&camp=1789&creative=9325&creativeASIN=B0000GKVXU&linkCode=as2&tag=chery01-20&linkId=TG3NZC7MWMIG54SQ” target=”_blank” title=”Dried Cornhusks”]dried cornhusks[/url]
- rubber or disposable gloves
- glue gun
- 2″ Styrofoam ball
- black card stock, cut into a 6″ circle
- scissors
- wood skewer
- empty wine bottle
- Dye cornhusks in fabric dye according to package instructions. Allow cornhusks to dry until just damp.
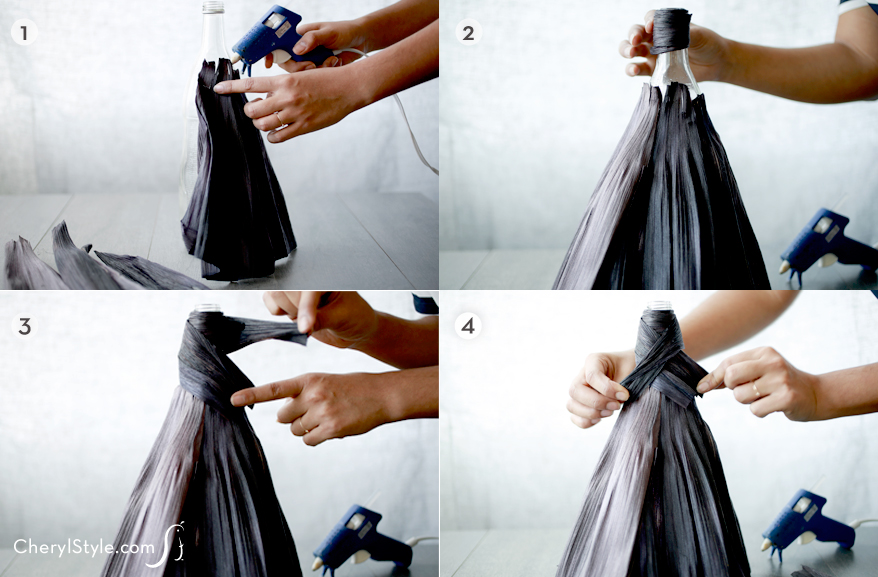
- To make the witch’s body, hot-glue the narrow end of 1 cornhusk to the neck of your empty wine bottle. You want the wider end of the husks to be flush with the bottom of the bottle. Continue to layer and glue individual husks, working your way around the bottle until it is completely covered and full, making up the witch’s dress.
- Next, glue and wrap 1 cornhusk around the neck of the bottle, leaving the seam where you want the back of the witch to be. Then wrap another husk over the ‘chest’ of the bottle, crisscrossing the 2 ends in the front and gluing securely in place. (see photos below)
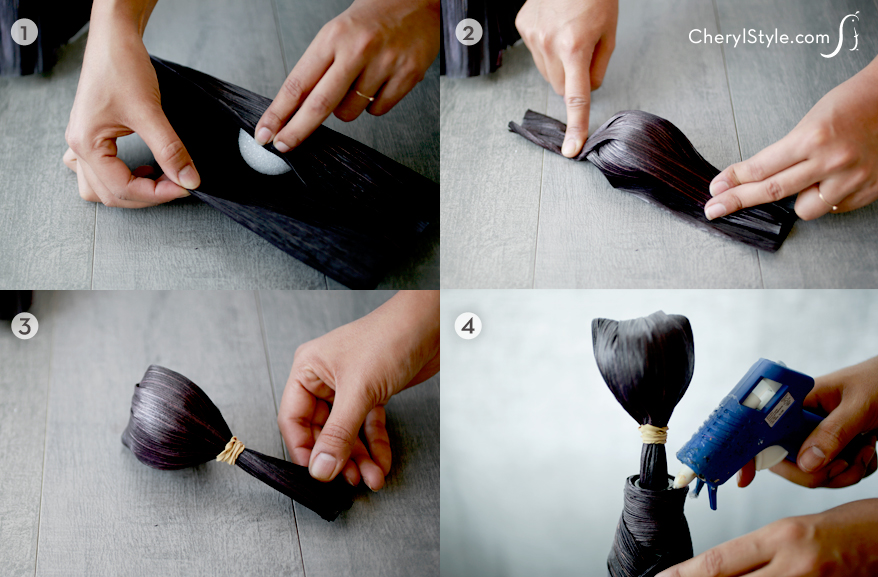
- To make the witch’s head, place a Styrofoam ball inside a damp cornhusk then roll into a cigar shape so the ball is completely covered. Next fold the top end of the husk over the ball until the two husk ends are gathered together forming a ‘neck’. Use hot glue then a rubber band to secure the ends together. Apply hot glue around the lip of the bottle and on the witch’s ‘neck’ then insert the ‘neck’ into the bottle, leaving just the head showing. Hold into place until secure. (see photos below)
- Next begin making the witch’s cape. Grab enough husks to cover the back and sides of your witch’s neck. Apply a strip of glue to one cornhusk, about 1″ down from the narrow end and glue in place behind the back of the neck. Continue gluing husks around each side of the neck, curl the husks to form a collar (you may need to soften them with a little water).
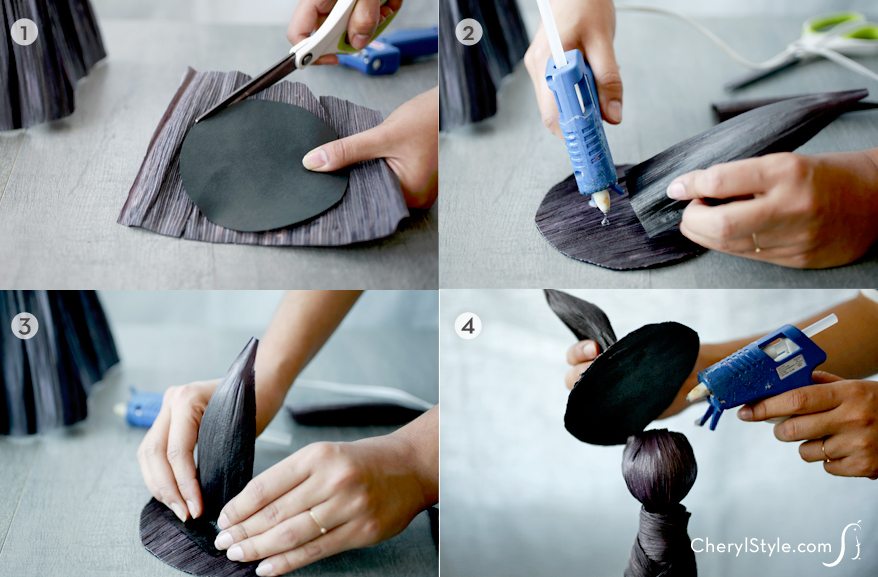
- To make the witch’s hat, glue one piece of cornhusk on top of the 6″ circle of card stock, trim excess to match the size of the circle. Next, trim the ends off of 3 strips of cornhusks then glue the wide ends of each husk to the center of the circle, forming the base of the cone shape. Gather top ends of the husks forming the point of the hat, then glue together. Glue the hat to the top of the head. (see photos below)
- To make the broom, take a few pieces of cornhusk, glue them to the end of the wooden skewer, and press firmly to adhere. Glue the broom to the hip of the witch and then display!
Corn Husk Witch Body
Corn Husk Witch Head
Corn Husk Witch Hat


